21 March, 2018

Meraki switches/clients offline after MX250 failover (NAT HA setup)

discussion topic at https://community.meraki.com/t5/Network-Wide/Switches-clients-offline-after-MX250-failover-NAT-HA-setup/m-p/11912#M292

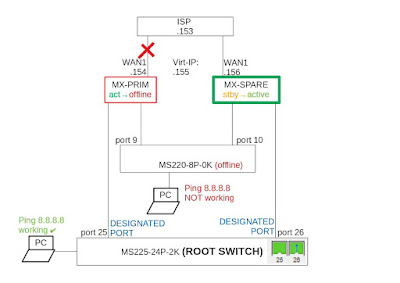
 I have two MX250 firewalls set up in a NAT HA failover pair, using the network-connected design for VRRP heartbeats.

Both MX250s have one link connected to WAN1 in the same subnet and I'm using the Virtual-IP for client traffic headed to the internet.

The problems start when I disconnect MX250-Primary-Master's WAN1: the MX250-Spare takes over the master role within seconds. However most clients and switches do not regain internet connectivity- the switches go offline and clients connected to switches have no internet, BUT with the exception of the root switch MS225-24P-2K. The root switch regains internet connectivity and clients behind root switch can also access the internet. But rest of the switches and clients are offline- can not even ping the gateway (gateways are in the MX250). I have included two illustrations of the working setup and the nonworking setup after MX250 failover. I also have an open case with Meraki but no solution yet.


07 December, 2016

Cisco IP telefoni seadistamine VOIP suhtluseks Telia/Elioni võrgus

Telefoniks on Cisco SPA303, töötab tarkvara versioonil 7.6.2 (SPA30x_SPA50x_7.6.2_FW.zip)
VOIP teenust pakub Telia (Elion).

Telefoni registreerimiseks Telia (Elion) võrgus on vajalik seadistada telefon järgnevalt (jämedas kirjas parameetrid peavad kindlasti õiged olema, ülejäänute kohapealt ei ole kindel ja pole testinud kas võivad olla olemata):

######### Ext1
##### Proxy settings
Proxy: elion.ee
Outbound Proxy: proxy.elion.ee
Use outbound Proxy: Yes
Register: Yes
Register expires: 60 

#### Subscriber Information
Display Name: 3723xxxxxx
User ID: 3723xxxxxx
Password: xyxyxyxy
Use Auth ID: Yes
Auth ID: 3723xxxxxx@elion.ee
SIP URI: 3723xxxxxx 

######## System
#### Optional Network Configuration
Hostname: 3xxxxxx
Primary NTP Server: 3.ee.pool.ntp.org
Secondary NTP Server: 0.europe.pool.ntp.org
NTP Enable: yes
Domain: elion.ee

######## Phone
#### General
Station Name: 3xxxxxx
Station Display Name: 3xxxxxx

24 November, 2016

Locking the screen of a Windows VM after suspending the VM in VMware Workstation

Edit the suspend-vm-default.bat script inside VM located in C:\Program Files\VMware\VMware Tools\ and add the following line before the ipconfig line:

tsdiscon console

So the entire script looks like:
@REM ########################################################################
@REM # DO NOT modify this file directly as it will be overwritten the next
@REM # time the VMware Tools are installed.
@REM ########################################################################
tsdiscon console
@%SYSTEMROOT%\system32\ipconfig /release
@REM # DO NOT REMOVE THIS LINE.  To avoid propagating any ipconfig errors, at
@REM # least one (successful) statement must follow it.

At first I tried solving the screenlocking with command:

rundll32.exe user32.dll,LockWorkStation

but that did not seem to work if executed by VMtools- probably because it was executed outside the current user session and was not able to interact with user desktop and probably got an error:

"ERROR: Input redirection is not supported, exiting the process immediately".

Atleast that is the error I saw when executing the command through psexec (-s is for SYSTEM privileges):
psexec -s "c:\test.bat"
If executing it with -s and -i (-i for interacting with user desktop) the lock screen worked fine.

For reference:
http://windowsitpro.com/systems-management/jsi-tip-5428-how-do-i-use-tsdiscon-command-disconnect-windows-2000-terminal-servi 
https://technet.microsoft.com/en-us/library/cc785434(v=ws.11).aspx

23 September, 2016

Windows 10 anniversary update 1607, domain account, Windows Hello, PIN and fingerprint login disabled

Made a clean install of Windows 10 v1607 to my laptop, joined it to a domain, logged in as a domain user. Tried to enable PIN login and fingerprint login, but the options were greyed out.
In GPEDIT.msc I enabled the use of biometrics under Local Computer Policy, Computer Configuration, Administrative Templates, Windows Components, Windows Hello for Business, Use Biometrics.
I also created a new registry entry in [HKEY_LOCAL_MACHINE\SOFTWARE\Policies\Microsoft\Windows\System] "AllowDomainPINLogon"=dword:00000001

Rebooted, logged in as a domain user and now I can add PIN and fingerprints.

08 December, 2015

Configuring DHCP option 43 and 60 for CAP1702 AP

Configuring DHCP option 43 and 60 for CAP1702 AP: http://www.cisco.com/c/en/us/td/docs/wireless/access_point/1700/quick/guide/ap1700getstart.html#44622
If WLC addresses are 192.168.50.51 and 192.168.50.52 then the DHCP options configuration would be:
VLAN DHCP options:
option 43, HEX, f1:08:c0:a8:32:33:c0:a8:32:34
option 60, text, Cisco AP c1700

02 December, 2015

Upgrade Catalyst 4500 VSS software from 03.06.02E to 03.06.03E [FAILED]

Two Catalyst WS-C4503-E switches are set up as VSS with Sup8-E on IOS-XE 03.06.02E.
The goal is to upgrade the VSS with ISSU to version 03.06.03E without network disruption.

Current 03.06.02E is running in "Install mode" (not "Bundle mode"):
boot-start-marker
boot system bootflash:packages.conf
boot-end-marker

Configuration register is 0x102 on both switches.

New IOS-XE 03.06.03E was copied to the bootflashes of both switches:
cat4k#dir bootflash: | i 03.06.03
cat4500es8-universalk9.SPA.03.06.03.E.152-2.E3.bin

tll-lauteri-cat4k#dir slavebootflash: | i 03.06.03
cat4500es8-universalk9.SPA.03.06.03.E.152-2.E3.bin

The VSS active switch was using slot 1 for the Active Supervisor Engine and the VSS standby was using slot 11 for the Standby Supervisor Engine:
cat4k#sh issu state det
                               Slot = 1
                           RP State = Active
                         ISSU State = Init
                     Operating Mode = Stateful Switchover
                      Current Image = bootflash:packages.conf
          Pre-ISSU (Original) Image = N/A
         Post-ISSU (Targeted) Image = N/A

                               Slot = 11
                           RP State = Standby
                         ISSU State = Init
                     Operating Mode = Stateful Switchover
                      Current Image = bootflash:packages.conf
          Pre-ISSU (Original) Image = N/A
         Post-ISSU (Targeted) Image = N/A

I chose to use the 4-step ISSU procedure for the upgrade. For reference and guide I used pages:
http://www.cisco.com/c/en/us/td/docs/switches/lan/catalyst4500/XE3-6-0E/15-22E/configuration/guide/xe-360-config/issu_XE.html#pgfId-1091552
http://www.cisco.com/c/en/us/td/docs/switches/lan/catalyst4500/15-1-2/XE_340/configuration/guide/config/vss.html#wp1329888

I started with the first step:
cat4k#issu loadversion 1 bootflash:cat4500es8-universalk9.SPA.03.06.03.E.152-2.E3.bin 11 slavebootflash:cat4500es8-universalk9.SPA.03.06.03.E.152-2.E3.bin
% issu loadversion executed successfully, Standby is being reloaded

After that the following ISSU state could be read:
cat4k#show issu state detail
                               Slot = 1
                           RP State = Active
                         ISSU State = Load Version
                     Operating Mode = not reached
                      Current Image = bootflash:packages.conf
          Pre-ISSU (Original) Image = bootflash:packages.conf
         Post-ISSU (Targeted) Image = bootflash:cat4500es8-universalk9.SPA.03.06.03.E.152-2.E3.bin

Standby information is not available because it is in 'DISABLED' state

The standby VSS switch was installed the new 03.06.03E software and rebooted. 5 minutes later the standby switch booted the new IOS and this is what I saw in the active switch's terminal:
Dec  1 21:13:59.500: %C4K_IOSINTF-5-LMPHWSESSIONSTATE: Lmp HW session UP on slot 1 port 1.
Dec  1 21:13:59.535: %C4K_IOSINTF-5-LMPHWSESSIONSTATE: Lmp HW session UP on slot 1 port 2.
Dec  1 21:14:15.505: %VSLP-5-VSL_UP:  Ready for control traffic
Dec  1 21:14:21.473: %C4K_REDUNDANCY-6-DUPLEX_MODE: The peer Supervisor has been detected
Dec  1 21:15:01.288: %C4K_REDUNDANCY-2-IOS_VERSION_CHECK_FAIL: IOS version mismatch. Active supervisor version is 15.2(2)E2 (cat4500es8-UNIVERSALK9-M). Standby supervisor version is 15.2(2)E3 (cat4500es8-UNIVERSALK9-M). Redundancy feature may not work as expected. (This should be normal behavior during ISSU upgrade on VSS)
Dec  1 21:15:01.289: %C4K_REDUNDANCY-6-MODE: ACTIVE supervisor initializing for rpr mode
Dec  1 21:15:01.495: %C4K_REDUNDANCY-3-COMMUNICATION: Communication with the peer Supervisor has been established
Dec  1 21:15:06.168: %VSLP-2-VSL_DOWN:   All VSL links went down while switch is in ACTIVE role
Dec  1 21:15:06.532: %C4K_REDUNDANCY-3-COMMUNICATION: Communication with the peer Supervisor has been lost
Dec  1 21:15:06.549: %C4K_REDUNDANCY-3-SIMPLEX_MODE: The peer Supervisor has been lost

And the standby switch was sent to reboot and the same loop happened for 3 times in a row. Then the standby switch booted into rommon and needed serial console port access.

The logs from the standby switch from serial-console were:
*Dec  1 20:52:53.973: %C4K_REDUNDANCY-2-IOS_VERSION_CHECK_FAIL: STANDBY:IOS version mismatch. Active supervisor version is 15.2(2)E2 (cat4500es8-UNIVERSALK9-M). Standby supervisor version is 15.2(2)E3 (cat4500es8-UNIVERSALK9-M). Redundancy feature may not work as expected.
*Dec  1 20:52:53.973: %C4K_REDUNDANCY-2-NON_SYMMETRICAL_REDUNDANT_SYSTEM: STANDBY:STANDBY supervisor will operate in fallback redundancy mode rpr.
*Dec  1 20:52:57.014: %C4K_REDUNDANCY-3-COMMUNICATION: STANDBY:Communication with the peer Supervisor has been established
*Dec  1 20:52:57.937: %C4K_REDUNDANCY-2-VS_REBOOT_ON_RPR_FALLBACK: STANDBY:Supervisor in virtual-switch configuration cannot operate in redundancy mode RPR, will be rese
*Dec  1 20:52:58.035: %RF-5-RF_RELOAD: STANDBY:Self Reload. Reason: Virtual-switch fallback to RPR
*Dec  1 20:52:58.083: %SYS-5-RELOAD: STANDBY:Reload requested by Platform redundancy manager. Reload Reason: Virtual-switch fallback to RPR.
<Tue Dec  1 20:52:58 2015> Message from sysmgr: Reason Code:[3] Reset Reason:Reset/Reload requested by [console]. [Reload command]

The interesting part is that after the first ISSU command the auto-installer(?) extracted the new cat4500es8-universalk9.SPA.03.06.03.E.152-2.E3.bin into different .pkg packages and packages.conf (while renaming the old packages.conf to packages.conf.00-) and attempted to boot the new IOS also in "Install mode" from the new packages.conf.

With VSS down I could not proceed with the next ISSU steps and restored the old state with old software. ISSU upgrade failed.

06 November, 2015

Backup Cisco Nexus VLAN and VTP database

To backup a Cisco Nexus series' VLAN/VTP database there is an interesting catch.
For VTP clients, the VLAN and VTP database is stored in bootflash:///vlan.dat
For VTP servers, the VLAN and VTP database is stored in bootflash:///vtp.dat

A VTP server also has vlan.dat in its' bootflash, but it can not be read as long as the switch is configured as a VTP server.

Both vtp.dat on a VTP server and vlan.dat on a VTP client are the same in size (or almost the same). These files are not editable in a text editor, however VLAN names could be read from inbetween displayed gibberish.

Restoring VLAN and VTP configuration on a factory-default Nexus switch is easy:
1) Configure the VTP server with command:
vtp file bootflash:/vtp.dat
2) Copy the backup vtp.dat to bootflash:
copy usb1:///vtp.dat bootflash:///vtp.dat
3) wr
4) reload

28 August, 2015

Rename files with powershell

A simple powershell script for renaming files in a folder. Goal was to remove the ".txt" extensions from all files:

Get-ChildItem -Filter "*.txt" | Rename-Item -NewName {$_.Name -replace '.txt', ''}

30 June, 2015

Netflow traffic is not sent through a Macsec tunnel.

Having a problem of Netflow traffic not being sent through a Cisco macsec tunnel.
Illustration:

I suspect that the Netflow traffic is sent out unencrypted (from cat3650) and is dropped by the receiving peer (cat4500).

About to open a TAC case.

-update-

Opened a TAC case and proved that netflow was sent unencrypted.
A new bug was generated: CSCuv15264 3650 Netflow is not being encrypted by MACsec
No solution at the moment.

14 January, 2015

Run a C# application both on .NET Framework 3.5 and 4.5

I have an application written in C# and compiled with Visual Studio 2013 with a target framework of ".NET Framework 3.5 Client Profile".
The issue was that the compiled .exe would not run on Windows 8.1 (which has only .NET Framework 4.5 installed).
The solution was to include the app.config file besides the application .exe file.
The source of the .config file would be (sourced from http://stackoverflow.com/a/20865375) :

<?xml version="1.0" encoding="utf-8"?>
<configuration>
  <startup>
    <supportedRuntime version="v4.0" />
    <supportedRuntime version="v2.0.50727"/>
  </startup>
</configuration>
The app.config file is located in the same folder as the compiled .exe.
For example, if you have an executable compiled as clientapp.exe then you should also have the config file clientapp.exe.config in the same folder.
Now the .exe with a target framework of ".NET Framework 3.5 Client Profile" runs fine on a system with only .NET Framework 4.5 installed.

19 December, 2014

Install Nagios Core 4.0.8 and pnp4nagios-0.6.24

If getting error:
"perfdata directory "/usr/local/pnp4nagios/var/perfdata/" is empty. Please check your Nagios config"
then follow this guide:

http://www.aboutmonitoring.com/nagios4-check_mk-pnp4nagios-nagvis/ written by 

17 December, 2014

Performing check_uptime in Nagios through NRPE

Remote host side:
First make sure that the check_uptime plugin is present on the remote host, which is usually located in:
/usr/local/nagios/libexec/

Also you have to configure the remote host to accept the check_host command received.
Edit the file /usr/local/nagios/etc/nrpe.cfg and add the following line after "The following examples use hardcoded command arguments":
command[check_uptime]=/usr/local/nagios/libexec/check_uptime
So that upon receiving the command "check_uptime" plugin check_uptime in libexec is executed.


Nagios server side:
The check_uptime query can only be performed through NRPE plugin. Service "Uptime" executes plugin check_nrpe with an argument check_uptime. The actual check_uptime plugin is executed on the remote host- that is why the check_uptime plugin has to be present on the remote host.

Add following code inside /usr/local/nagios/etc/services.cfg :
define service{
        use                     generic-service
        host_name               remhost1,remhost2,remhost3
        service_description     Uptime
        check_command           check_nrpe!check_uptime
        }

12 December, 2014

Install Nagios Core 4.0.8 on Ubuntu Server 14.10

Command sequence for compiling and installing Nagios Core 4.0.8 and Nagios Plugins 2.0.3 on Ubuntu Server 14.10.

sudo apt-get install apache2
sudo apt-get install libapache2-mod-php5
sudo apt-get install build-essential
sudo apt-get install libgd2-xpm-dev
sudo useradd nagios
sudo passwd nagios
/usr/sbin/groupadd nagcmd
/usr/sbin/usermod -a -G nagcmd nagios
/usr/sbin/usermod -a -G nagcmd www-data
tar xzvf nagios-4.0.8.tar.gz
cd nagios-4.0.8
./configure  --with-nagios-group=nagios --with-command-group=nagcmd --with-httpd-conf=/etc/apache2
make all
make install
make install-init
make install-config
make install-commandmode
nano /usr/local/nagios/etc/objects/contacts.cfg # change email
make install-webconf
apt-get install apache2-utils # for next command
htpasswd -c /usr/local/nagios/etc/htpasswd.users nagios # Create a nagiosadmin account for logging into the Nagios web interface
tar xzvf nagios-plugins-2.0.3.tar.gz
cd nagios-plugins-2.0.3/
./configure --with-nagios-user=nagios --with-nagios-group=nagios
make
make install
ln -s /etc/init.d/nagios /etc/rcS.d/S99nagios
/usr/local/nagios/bin/nagios -v /usr/local/nagios/etc/nagios.cfg
cat /etc/apache2/nagios.conf >> /etc/apache2/apache2.conf

Add following code after DocumentRoot line inside /etc/apache2/sites-enabled/000-default.conf:
ScriptAlias /cgi-bin/ /var/cgi-bin/ 
<Directory "/var/cgi-bin">    
AllowOverride None    
Options +ExecCGI -MultiViews +SymLinksIfOwnerMatch    
Require all granted 
</Directory>


Continue...
ln -s /etc/apache2/mods-available/cgid.load /etc/apache2/mods-enabled/
ln -s /etc/apache2/mods-available/cgid.conf /etc/apache2/mods-enabled/
sudo a2enmod cgi
/etc/init.d/apache2 reload
/etc/init.d/nagios start

http://localhost/nagios should be running by now.

If you get an error like:
It appears as though you do not have permission to view information for any of the services you requested...
If you believe this is an error, check the HTTP server authentication requirements for accessing this CGI and check the authorization options in your CGI configuration file.

then make sure that /usr/local/nagios/etc/cgi.cfg contains correct values for:
authorized_for_system_information=nagios
authorized_for_configuration_information=nagios
authorized_for_system_commands=nagios
authorized_for_all_services=nagios
authorized_for_all_hosts=nagios
authorized_for_all_service_commands=nagios
authorized_for_all_host_commands=nagios

After changes restart nagios and apache2 services:
service nagios restart
service apache2 restart

01 December, 2014

Display WLAN AP BSSID association

Use command prompt with netsh:

C:\Users\heiki>netsh wlan show interfaces

There is 1 interface on the system:

    Name                   : Wi-Fi
    Description            : Intel(R) Centrino(R) Wireless-N 2200
    GUID                   : 2aec4c29-774f-4092-abb1-27c396cac1ab
    Physical address       : 9c:4e:36:3b:fa:2c
    State                  : connected
    SSID                   : kukimuki
    BSSID                  : f0:7f:06:3d:a3:30
    Network type           : Infrastructure
    Radio type             : 802.11n
    Authentication         : WPA2-Enterprise
    Cipher                 : CCMP
    Connection mode        : Auto Connect
    Channel                : 1
    Receive rate (Mbps)    : 144
    Transmit rate (Mbps)   : 144
    Signal                 : 99%
    Profile                : kukimuki

    Hosted network status  : Not available

14 November, 2014

Building MSI installer with startup registry keys using WIX Toolset

I needed an installer that would:
  • copy 2 specific files to a desired location
  • install one file as a Windows service (anyconnect_SBL.exe)
  • adding a HKLM startup registry key (local machine, not current user startup key) for one of those copied files (clientapp.exe)
For this I use the WIX Toolset http://wixtoolset.org/

Here is the code for build.wxs that worked as needed:

<?xml version="1.0" encoding="UTF-8"?>
<Wix xmlns="http://schemas.microsoft.com/wix/2006/wi">
    <Product Id="*" UpgradeCode="C2918EB3-4E89-4B1E-A3E6-BEBE1A0B0641" Version="1.1.0" Language="1033" Name="Anyconnect SBL service" Manufacturer="dumbajumba">
        <Package InstallerVersion="300" Compressed="yes"/>
        <Media Id="1" Cabinet="myapplication.cab" EmbedCab="yes" />
<!-- Step 1: Define the directory structure -->
<Directory Id="TARGETDIR" Name="SourceDir">
<Directory Id="ProgramFilesFolder">
<Directory Id="Cisco_Dir" Name="Cisco">
<Directory Id="CiscoAnyConnectSecureMobilityClient_Dir" Name="Cisco AnyConnect Secure Mobility Client">
<Directory Id="SBL_service_dir" Name="SBL_service"/>
</Directory>
</Directory>
</Directory>
</Directory>
<!-- Step 2: Add files to your installer package -->
<DirectoryRef Id="SBL_service_dir">
<Component Id="anyconnect_SBL.exe" Guid="E9663B0F-F740-43C5-AFAC-D5D1AF0AB1B8">
<File Id="anyconnect_SBL.exe" Name="anyconnect_SBL.exe" Source="anyconnect_SBL.exe" KeyPath="yes" Checksum="no"/>
<ServiceInstall Id="anyconnect_SBL.exe" DisplayName="anyconnect_SBL" Name="anyconnect_SBL.exe" ErrorControl="normal" Start="auto" Type="ownProcess" Vital="yes" />
<ServiceControl Id="anyconnect_SBL.exe" Name="anyconnect_SBL.exe" Start="install" Stop="uninstall" Remove="uninstall" />
</Component>
<Component Id="clientapp.exe" Guid="3C26A063-DEAB-416A-A568-8483A7764026">
<File Id="clientapp.exe" Name="clientapp.exe" Source="clientapp.exe" KeyPath="yes" Checksum="no"/>
<RegistryKey
Root="HKLM"
Key="Software\Microsoft\Windows\CurrentVersion\Run">
<RegistryValue Id="clientapp" Name="clientapp" Value="[SBL_service_dir]clientapp.exe" Type="string" />
</RegistryKey>
</Component>
</DirectoryRef>
<!-- Step 3: Tell WiX to install the files -->
<Feature Id="MainApplication" Title="Main Application" Level="1">
<ComponentRef Id="anyconnect_SBL.exe" />
<ComponentRef Id="clientapp.exe" />
</Feature>
</Product>
</Wix>

21 October, 2014

Netflow configuration for Prime Infrastructure 2.1 and Cisco CSR1000V

A note- in theory you need an Assurance license to use netflow-enabled devices in Prime.
However the Licenses section in Prime web UI shows that only Lifecycle licenses have been used by the netflow devices.

flow record type performance-monitor perfmon
 match policy performance-monitor classification hierarchy
 collect application http url
 collect application http host
 collect application http referer
!
!
flow exporter flowexporter
 destination 10.113.114.99
 source GigabitEthernet1
 ttl 5
 transport udp 9991
 export-protocol netflow-v5
!
!
flow monitor flowmonitor
 exporter flowexporter
 statistics packet protocol
 statistics packet size
 record netflow-original
!
interface GigabitEthernet1
 ip flow monitor flowmonitor input
 ip flow monitor flowmonitor output

You can check if the Netflow listening port on the Prime IS VM is 9991 with command:
primeva/admin# sh ports
Process : rpc.statd (3559)
     tcp: 0.0.0.0:773
     udp: 0.0.0.0:770, 0.0.0.0:767
Process : rsyslogd (11816)
     tcp: 0.0.0.0:65000, :::65000
     udp: 0.0.0.0:8514, :::8514
Process : portmap (3514)
     tcp: 0.0.0.0:111
     udp: 0.0.0.0:111
Process : Decap_main (5226)
     tcp: 127.0.0.1:2000
     udp: :::514, :::162
Process : Xvfb (5042)
     tcp: 0.0.0.0:6100, :::6100
Process : sshd (3930)
     tcp: 0.0.0.0:22, :::22
Process : sam_daemon (6159)
     tcp: 0.0.0.0:2012
     udp: 127.0.0.1:47044
Process : java (6086)
     tcp: :::11011, :::11012, :::11013, :::11014, :::8009, :::1199, :::80, :::16
113, :::2001, :::61617, :::45265, :::61237, :::443
     udp: :::9991, :::57612, :::25361, :::29245, :::37492

Prime Infrastructure 2.1 and Nexus 3048, Partial Collection Failure

Prime:
Cisco Application Deployment Engine OS Release: 2.0
ADE-OS Build Version: 2.0.6.003-px-build
ADE-OS System Architecture: x86_64
Cisco Prime Infrastructure
Version : 2.1.0.0.87
Installed 60-day Lifecycle license.

Nexus 3048:
Software
  BIOS:      version 1.2.0
  system:    version 6.0(2)U2(2)

Added Nexus 3048 as a device in Prime. Prime has access to the device via SSHv2 and SNMPv3.
As a result I only see partial desired information. I see the management IP address, software version, uptime, model, but I dont see any interfaces of the Nexus switch.
The Inventory Collection Status in Prime shows a status of "Partial Collection Failure" with hints:

  • Unable to collect the extended inventory info from device for Image Management Operations
    • Image Recommendation and Upgrade Analysis may not work..
      • Verify SNMP credentials and SNMP response speed from device.
  • Unable to collect Ethernet interfaces details.
    • Interface configuration and monitoring capabilities will be limited..
      • Unexpected error. See the log file inventory.log for details.


Checking the inventory.log I see following errors:

[2014-10-20 22:00:04,599] [backgroundThreadPoolExecutor-2] [inventory] [ERROR] - 10.113.114.243 For device id: 2274272 Feature = feature_l2interface and Procedure = l2interface failed in time 2075 with the following error and continuing with other features: com.cisco.nm.expression.function.FunctionException: <palError><deviceId>2274272</deviceId><code>VALIDATION_ERROR</code><message>Failed to validate output XML: cvc-complex-type.2.4.a: Invalid content was found starting with element 'ifSpeed'. One of '{ifIndex, name}' is expected.

[2014-10-20 22:00:04,599] [backgroundThreadPoolExecutor-2] [ice] [ERROR] - com.cisco.nm.expression.function.FunctionException: <palError><deviceId>2274272</deviceId><code>VALIDATION_ERROR</code><message>Failed to validate output XML: cvc-complex-type.2.4.a: Invalid content was found starting with element 'ifSpeed'. One of '{ifIndex, name}' is expected.

Caused by: com.cisco.nm.pal.client.PALException: Failed to validate output XML: cvc-complex-type.2.4.a: Invalid content was found starting with element 'ifSpeed'. One of '{ifIndex, name}' is expected.

Caused by: org.xml.sax.SAXParseException: cvc-complex-type.2.4.a: Invalid content was found starting with element 'ifSpeed'. One of '{ifIndex, name}' is expected.

Haven't tried an update patch 2.1.1 for Prime 2.1 (pi211_20140630_01.ubf) yet.
Haven't tried "Prime Infrastructure 2.1-Device Pack 5" (pi_2.1device_packs_5-45.ubf) yet.
No such issues on a Cisco Cloud Services Router 1000V.

15 October, 2014

Cisco Catalyst DHCP server: ASSIGNMENT FAILURE, POOL EXHAUSTED

Had an issue with Cisco Catalyst 2960 switch not assigning IP from the configured DHCP pool.
WS-C2960S-24PS-L running IOS 15.2(1)E, C2960S-UNIVERSALK9-M

First debugging DHCP events:

Wifi-cat#debu ip dhcp server events
Oct 14 14:26:23.567: DHCPD: Sending notification of DISCOVER:
Oct 14 14:26:23.567:   DHCPD: htype 1 chaddr 4c00.821a.e425
Oct 14 14:26:23.567:   DHCPD: interface = Vlan225
Oct 14 14:26:23.567:   DHCPD: class id 436973636f204150206331363030
Oct 14 14:26:23.567:   DHCPD: out_vlan_id 0
Oct 14 14:26:23.567: DHCPD: Sending notification of DISCOVER:
Oct 14 14:26:23.567:   DHCPD: htype 1 chaddr 4c00.821a.e425
Oct 14 14:26:23.567:   DHCPD: interface = Vlan225
Oct 14 14:26:23.567:   DHCPD: class id 436973636f204150206331363030
Oct 14 14:26:23.567:   DHCPD: out_vlan_id 0
Oct 14 14:26:23.567: DHCPD: subnet [10.241.102.97,10.241.102.126] in address pool Wifi-pool is empty.
Oct 14 14:26:23.567: DHCPD: Sending notification of ASSIGNMENT FAILURE:
Oct 14 14:26:23.567:   DHCPD: htype 1 chaddr 4c00.821a.e425
Oct 14 14:26:23.567:   DHCPD: remote id 020a00000af166630c000000
Oct 14 14:26:23.567:   DHCPD: interface = Vlan225
Oct 14 14:26:23.567:   DHCPD: class id 436973636f204150206331363030
Oct 14 14:26:23.567:   DHCPD: out_vlan_id 0
Oct 14 14:26:23.567: DHCPD: Sending notification of ASSIGNMENT_FAILURE:
Oct 14 14:26:23.567:  DHCPD: due to: POOL EXHAUSTED
Oct 14 14:26:23.567:   DHCPD: htype 1 chaddr 4c00.821a.e425
Oct 14 14:26:23.567:   DHCPD: remote id 020a00000af166630c000000
Oct 14 14:26:23.567:   DHCPD: interface = Vlan225
Oct 14 14:26:23.567:   DHCPD: class id 436973636f204150206331363030
Oct 14 14:26:23.567:   DHCPD: out_vlan_id 0

Then checking the affected DHCP pool for statistics:

Wifi-cat#sh ip dhcp pool Wifi-pool

Pool Wifi-pool :
 Utilization mark (high/low)    : 100 / 0
 Subnet size (first/next)       : 0 / 0
 Total addresses                : 30
 Leased addresses               : 0
 Excluded addresses             : 7
 Pending event                  : none
 1 subnet is currently in the pool :
 Current index        IP address range                    Leased/Excluded/Total
 0.0.0.0              10.241.102.97    - 10.241.102.126    0     / 7     / 30

I see that 0 addresses are leased, 7 excluded and 30 total- should be enough free addresses to lease.
But current index shows 0.0.0.0 which means:
The Current index for the first two subnets is 0.0.0.0, indicating that each of these subnets has used all its available addresses.
http://www.cisco.com/c/en/us/td/docs/routers/10000/10008/configuration/guides/broadband/bba/odap.html#wp1073035

Checking the conflicts database indicates that there are no conflicts.
Wifi-cat#sh ip dhcp conflict

But still, just in case I tried clearing the conflicts:
Wifi-cat#clear ip dhcp pool Wifi-pool conflict *

As a result the DHCP server started leasing IPs and the current index reset itself:
Wifi-cat#sh ip dhcp pool Wifi-pool

Pool Wifi-pool :
 Utilization mark (high/low)    : 100 / 0
 Subnet size (first/next)       : 0 / 0
 Total addresses                : 30
 Leased addresses               : 1
 Excluded addresses             : 7
 Pending event                  : none
 1 subnet is currently in the pool :
 Current index        IP address range                    Leased/Excluded/Total
 10.241.102.102       10.241.102.97    - 10.241.102.126    1     / 7     / 30

Don't know why this situation happened. Could be a software bug? Still investigating.
It is somewhat similar to the previous DHCP issue I described before:

02 September, 2014

Exhausted DHCP address range in a WLAN

Had a problem with some clients suddenly not being able to get an IP address lease via DHCP.

The DHCP server was configured inside a Catalyst 2960S switch:

ip dhcp excluded-address 172.16.40.1 172.16.40.49
ip dhcp pool ADDRESSPOOL
 network 172.16.40.0 255.255.255.0
 dns-server 8.8.8.8
 default-router 172.16.40.1
 lease 0 8
!

As seen the host address range for Wifi clients should be 204 addresses from 172.16.40.50 to 172.16.40.254.

However looking at sh ip dhcp pool I see the following:

Wifi-cat#sh ip dhcp pool

Pool Wifi-SSID-PILV :
 Utilization mark (high/low)    : 100 / 0
 Subnet size (first/next)       : 0 / 0
 Total addresses                : 254
 Leased addresses               : 82
 Excluded addresses             : 172
 Pending event                  : none
 1 subnet is currently in the pool :
 Current index        IP address range                    Leased/Excluded/Total
 0.0.0.0              172.16.40.1      - 172.16.40.254     82    / 172   / 254

The ip address range for hosts has been exhausted because the excluded address range has grown to 172 for some reason.
Looking at sh ip dhcp conflict reveals that there is a ton of dhcp conflicts:

Wifi-cat#sh ip dhcp conflict
IP address        Detection method   Detection time          VRF
172.16.40.87      Gratuitous ARP     Nov 05 2013 01:43 PM
172.16.40.211     Gratuitous ARP     Nov 19 2013 08:05 AM
172.16.40.188     Gratuitous ARP     Nov 19 2013 09:16 AM
172.16.40.123     Gratuitous ARP     Nov 22 2013 06:51 AM
172.16.40.187     Gratuitous ARP     Nov 22 2013 06:57 AM
172.16.40.61      Gratuitous ARP     Nov 27 2013 01:42 PM
172.16.40.97      Gratuitous ARP     Dec 05 2013 08:19 AM
.....
.....

This could be a result of someone manually assigning static IP addresses to their WLAN interface, thus causing IP address conflicts in the WLAN. Catalyst switches automatically add that conflicting IP address to its' Excluded IP addresses database and won't remove them from it unless configured otherwise.

The solution was to clear the conflict database on the Catalyst switch:
clear ip dhcp conflict *

Then added a command for the switch to recheck (every 1440 minutes) the conflict database for remaining conflicts (and clear from database if conflict is resolved):
ip dhcp conflict resolution interval 1440

And configured to log a message if the DHCP IP address utilization went over 80%:
ip dhcp pool ADDRESSPOOL
 utilization mark high 80 log


04 August, 2014

Mozilla Firefox and Certificate Stores

Mozilla Firefox does not use Windows Certificate Stores. It only uses its' own Certificate Store located in cert8.db
There is no solution to make Firefox use Windows Certificate Stores.
(Chrome and IE use Windows Certificate Store.)

07 July, 2014

Write a Windows Service in C#

using System;
using System.Collections.Generic;
using System.Linq;
using System.Text;
using System.ServiceProcess;
using System.Configuration.Install;
using System.ComponentModel;
using System.Diagnostics;

namespace anyconnect_SBL
{
    class Program : ServiceBase
    {
        static void Main(string[] args)
        {
            ServiceBase.Run(new Program());
        }
        public Program()
        {
            this.ServiceName = "Anyconnect_SBL";
            Process myProcess = new Process();
            try
            {
                string dir = AppDomain.CurrentDomain.BaseDirectory;
                string parent = System.IO.Directory.GetParent(System.IO.Directory.GetParent(dir).FullName).FullName;
                myProcess.StartInfo.UseShellExecute = false;
                myProcess.StartInfo.FileName = parent + "\\vpncli.exe";
                myProcess.StartInfo.CreateNoWindow = true;
                myProcess.Start();
            }
            catch (Exception e)
            {
                Console.WriteLine(e.Message);
            }
        }
        protected override void OnStart(string[] args)
        {
            base.OnStart(args);
        }
        protected override void OnStop()
        {
            base.OnStop();
        }
    }  
        [RunInstaller(true)]
        public class MyWindowsServiceInstaller : Installer
        {
            public MyWindowsServiceInstaller()
            {
                var processInstaller = new ServiceProcessInstaller();
                var serviceInstaller = new ServiceInstaller();

                processInstaller.Account = ServiceAccount.LocalSystem;

                serviceInstaller.DisplayName = "My Service";
                serviceInstaller.StartType = ServiceStartMode.Manual;

                serviceInstaller.ServiceName = "Anyconnect_SBL";

                this.Installers.Add(processInstaller);
                this.Installers.Add(serviceInstaller);
            }
        }  
}

12 June, 2014

Disable Cisco Anyconnect automatic startup at boot.

Not so easy.. some references:
https://supportforums.cisco.com/discussion/11643501/anyconnect-3101-disable-client-startup
https://tools.cisco.com/bugsearch/bug/CSCtn12023

Best solution so far seems to be renaming the vpnui.exe on client machine.
To avoid scripts I decided to rename the file in the anyconnect MSI installer package.
Under the File table, find a vpnui.exe entry in FileName and rename it to vpn.exe
That way the anyconnect GUI client is installed as vpn.exe preventing the startup from launching vpnui.exe.
Also added screenshot:

11 June, 2014

22 May, 2014

Create Task scheduler task via commandline/powershell.

schtasks.exe /Create /TN hello_world /SC ONEVENT /EC Security /MO *[System/EventID=4624] /TR C:\hello.vbs /RU BUILTIN\Users  /DELAY 0000:10

No way to disable via commandline with schasks.exe:
Task Scheduler GUI, Conditions, Power: Start the task only if the computer is on AC power.

Create Task via GUI, export, import via commandline:
schtasks.exe /Create /TN hello_world /XML C:\hello_world.xml
http://social.technet.microsoft.com/Forums/windows/en-US/8d45efa6-a82f-4fb7-8064-77a30ec645ba/is-it-possible-to-disable-the-run-on-ac-power-using-schtasksexe-cmdline-switches?forum=w7itprogeneral

14 May, 2014

Cisco ASA Dynamic Access Policies (DAP) configuration

Equal priority DAP rules- deny evaluated first, then rest. Split DAP into several, add DAP priority to have desired order of defined ACLs.


to be continued...

08 May, 2014

Vlan bridge on Ubuntu Linux

I have 4 VLANs:
40 (192.168.40.0/24)
41 (192.168.41.0/24)
42 (192.168.42.0/24)
43 (192.168.43.0/24)
114 (no ip subnet assigned)

A client in VLAN 114 needs Layer2 access to all VLANs from 40 to 43.
A solution is to build a Ubuntu Linux based network bridge that bridges all VLANs (40,41,42,43,114) together.

Ubuntu prepare:
apt-get install bridge-utils
apt-get install vlan
modprobe 8021q
sh -c 'grep -q 8021q /etc/modules || echo 8021q >> /etc/modules'
brctl addbr br0

Ubuntu network configuration:

/etc/network/interfaces:
# BRIDGE INTERFACE
auto br0
iface br0 inet manual
bridge_ports eth1.40 eth1.41 eth1.42 eth1.43 eth1.114
bridge_stp off
bridge_maxwait 0
bridge_fd 0

# TRUNK dot1Q
auto eth1
iface eth1 inet manual
auto eth1.40
iface eth1.40 inet manual
auto eth1.41
iface eth1.41 inet manual
auto eth1.42
iface eth1.42 inet manual
auto eth1.43
iface eth1.43 inet manual
auto eth1.114
iface eth1.114 inet manual

15 April, 2014

Anyconnect .MSI package modifications


  • preferences.xml is not created on anyconnect install.
  • preferences.xml is created when editing Anyconnect options OR on first successful VPN connection to ASA.
  • preferences.xml is created locally in: C:\Users\%username%\AppData\Local\Cisco\Cisco AnyConnect Secure Mobility Client


The only reference to preferences.xml in the anyconnect-win-3.1.05160-pre-deploy-k9.msi package is:
Table: CustomAction;
Action: MoveUserPrefs
Type: 3154
Source: InstallHelper.exe
Target: -moveIfExist "[LocalAppDataFolder]\Cisco\Cisco AnyConnect VPN Client\preferences.xml" "[Cisco_AnyConnect_Secure_Mobility_Client_DIR]\preferences.xml"


---

Need to add a client-profile in MSI package.
Created extra row in File table:

File: acp_Default.xml
Component: acp_Default.xml
Filename: acp_Default.xml
FileSize: 3385
Sequence: 95

09 April, 2014

Setting up TLS tunnel between Cisco XNC Controller (TLS client) and onePK router (TLS server)

Generate new self-signed certificate and a private key in Ubuntu (XNC host):
openssl req -new -x509 -extensions v3_ca -keyout xnc-private.pem -out xnc-cert.pem -days 3650

Combine xnc-private.pem and xnc-cert.pem into one:
cat xnc-privkey.pem xnc-cert.pem > xnc.pem

Convert xnc.pem to pkcs12:
openssl pkcs12 -export -out xnc.p12 -in xnc.pem

Generate password-protected Java keystore of xnc.p12:
keytool -importkeystore -srckeystore xnc.p12 -srcstoretype pkcs12 -destkeystore tlsKeyStore -deststoretype jks

Export router's certificate to XNC Controller.
c891(config)#crypto pki export c891 pem terminal

Generate password-protected Java truststore of sw-cacert.pem:
keytool -import -alias swca1 -file sw-cacert.pem -keystore tlsTrustStore

Start XNC script:
./runxnc.sh -start 8022 -tls -tlskeystore tlsKeyStore -tlstruststore tlsTrustStore

Configure the passwords for router, keystore and truststore with:
bin/./configkeystorepwd.sh so that the XNC can decrypt the encrypted truststore/keystore.


The router's (TLS client) default self-signed certificate (might look something like IOS-Self-Signed-Certificate-2124668178) is not suitable for establishing a working TLS tunnel with the XNC controller (TLS server).


If debugging the XNC script with
./runxnc.sh -start 8022 -tls -tlskeystore tlsKeyStore -tlstruststore tlsTrustStore -console -debug
and adding a onePK client you might be given an error by the script:
No subject alternative names matching IP address

Solution was to delete the factory IOS self-signed certificate and generate a new one with the subject alternative name matching the router's IP. 
Sample trustpoint configuration:
crypto pki trustpoint c891
 enrollment selfsigned
 serial-number
 ip-address 10.113.114.210
 subject-name cn=c891
 subject-alt-name 10.113.114.210
 revocation-check none
 rsakeypair c891keys

28 March, 2014

Cisco Anyconnect Client Profile and certificate matching.

For some reason I have not succeeded in matching Windows user's certificates to the one specified in the Anyconnect Client Profile.

something similar is described at
https://supportforums.cisco.com/discussion/11533701/cisco-anyconnect-3008057-certificate-validation-failure
opened discussion https://supportforums.cisco.com/discussion/12159256/anyconnect-vpn-certificate-matching-not-working

Still investigating and to be continued...

-update-

Issue was solved by defining the ASA hostname in the serverlist inside the Client-profile. All I had to add in the server list was:
Host Display Name (required): vingeasa
FQDN or IP address: vingeasa

After that certificate matching was working as needed.

25 March, 2014

Anyconnect VPN automatic reconnect using Anyconnect vpncli.exe and scripting

User has Windows login screen with option for SBL (start before logon).
User starts Anyconnect VPN via SBL (authenticated via a machine certificate).
User can now login to Windows as AD user.
User has now logged in to his AD Windows account.

Now I need the SBL VPN session to automatically disconnect and automatically reauthenticate with the AD user's personal certificate- without user intervention.

I can use Anyconnect's ability to push and execute scripts on VPN clients to achieve automation of this process.

Anyconnect also has a CLI based client I can use:
C:\Program Files (x86)\Cisco\Cisco AnyConnect Secure Mobility Client\vpncli.exe

and the GUI client:
C:\Program Files (x86)\Cisco\Cisco AnyConnect Secure Mobility Client\vpnui.exe

vpncli.exe can perform following tasks:
connect
disconnect
hosts
stats
state
block

Disconnect can be used whenever needed.
Connect can be used only if vpnui.exe is not running.
Otherwise you get a message:
>> error: Connect not available. Another AnyConnect application is running
or this functionality was not requested by this application.
I can write a script that is launched by the Anyconnect GUI client (vpnui.exe)
Anyconnect GUI client (vpnui.exe) is running in administrative rights- meaning launched scripts also run in administrative rights.

The script performs follwing actions:
1) Disconnects current SBL VPN session.
2) Kills vpnui.exe process (needs admin rights)
3) Starts vpncli.exe (in standard user rights) and starts VPN connection with user's personal certificate.
4) Starts vpnui.exe process

If all 4 steps are automated via script(s) then the user must  enter login name and password only when logging in to Windows AD account.

to be continued...

06 March, 2014

DHCP relay issues in a bridged network

Topology of setup:


DHCP server is sending only DHCP NAK in response to client's DHCP request.
Thinking that the issue is related to an identical DHCP Transaction ID used in both DHCP Offers from server.

DHCP process walkthrough:

  1. Client sends DHCP Discovery (broadcast) with self-generated transaction ID: 123
  2. DHCP Discovery reaches DHCP server through 2 different Relay-agents (192.168.42.1 and 192.168.43.1) due to bridged networks.
  3. DHCP server generates 2 different DHCP Offers with identical Transaction IDs, although both offered IP-address are from different subnets (42.0/24 and 43.0/24). Those DHCP offers are unicasted (from relay-agent) to the client.
  4. Client receives both DHCP offers from vlan 114 and chooses one for a request.
  5. Client broadcasts the DHCP request.
  6. The DHCP request reaches the DHCP server. DHCP server sees the DHCP request with a TransactionID that is mapped to 2 different DHCP offers. The server responds with a DHCP NAK (negative acknowledgement). (Maybe DHCP server is not allowed to send DHCP ACK if a TransactionID is associated with more than one DHCP offers?)
  7. DHCP has failed.

04 March, 2014

Enable onePK on Cisco CSR1000V

I am running:
Cisco IOS XE Software, Version 03.11.01.S - Standard Support Release
Cisco IOS Software, CSR1000V Software (X86_64_LINUX_IOSD-UNIVERSALK9-M), Version 15.4(1)S1, RELEASE SOFTWARE (fc2)

using license:
License Level: premium
License Type: Evaluation License
Next reload license Level: premium

Index 24 Feature: prem_eval
        Period left: 8  weeks 3  days
        License Type: Evaluation
        License State: Active, In Use
        License Count: Non-Counted
        License Priority: Low

The onePK status shows:
CSR#sh onep status
Status: enabled
Version: 1.1.0
Transport: tcp; Status: disabled
Transport: tls; Status: disabled
Transport: tipc; Status: running; Port: 15003
Session Max Limit: 10
CPU Interval: 0 seconds
CPU Falling Threshold: 0%
CPU Rising Threshold: 0%
History Buffer: Enabled
History Buffer Purge: Oldest
History Buffer Size: 32768 bytes
History Syslog: Disabled
History Archived Session: 0
History Max Archive: 16


Service Set: Base               State: Enabled     Version 1.1.0
Service Set: Vty                State: Disabled    Version 0.1.0
Service Set: OneFW              State: Disabled    Version 0.1.0
Service Set: Mediatrace         State: Disabled    Version 1.0.0

I would like to enable Transport: tcp, but I dont know how to.
The transport command is not recognized:
CSR(config)#onep
CSR(config-onep)#transport?
% Unrecognized command
CSR(config-onep)#?
ONEP configuration commands:
  cpu      CPU resource
  default  Set a command to its defaults
  exit     Exit from ONEP configuration mode
  history  One Platform History Trails
  no       Negate a command or set its defaults
  service  ONEP service set
  session  One Platform Session


Am I missing something?
Opened a discussion at
https://supportforums.cisco.com/thread/2270684

--update-

seems like a bad/unsupported VM image.
running a physical ISR c891 with special IOS for onePK works as intended.

27 February, 2014

Regex expression for timestamp filtering

Need to cover a time range from 17:30 to 08:00 with regex.
Came up with this:
2...-..-..T+([0][0-8]|[1][8-9]|[2][0-3]|(17):([3][0-9]|[4][0-9]|[5][0-9]))

Actual time matching begins after ..T+


21 February, 2014

Bridging VLANs in Linux.

Troubleshooting this odd VLAN bridging design:

For some reason unicast packets from the GW wont reach host A.
Note that host in vlan43 has successfully acquired IP from vlan114 DHCP range. 
Host A ARP table shows the 10.113.114.1 hardware address as incomplete.
to be continued...

-update-
problem solved. Issue was that a vmware vswitch does not accept several MAC addresses from a single port. Use promiscuous mode or replace it with a physical switch.

19 February, 2014

Cisco IOS empty XML output issue

Noticed a weird issue with using the | format command. The switch had been idle for about 16 hours since last connection.

Issued command:
DLS2#sh cdp neighbors detail | format

Got reply:
<?xml version="1.0" encoding="UTF-8"?>
  <show_cdp_neighbors_detail xmlns="ODM://flash:/finalspan.odm//show_cdp_neighbors_detail">
    <SpecVersion>built-in</SpecVersion>
  </show_cdp_neighbors_detail>

No output of CDP whatsoever. I issued the same command again, 5 seconds later without any config alteration:
DLS2#sh cdp neighbors detail | format

Got reply:
<?xml version="1.0" encoding="UTF-8"?>
  <show_cdp_neighbors_detail xmlns="ODM://flash:/finalspan.odm//show_cdp_neighbors_detail">
    <SpecVersion>built-in</SpecVersion>
    <beginner>
      <remote_hostname>DLS1</remote_hostname>
      <remote_ip_addr>10.1.1.11</remote_ip_addr>
      <local_int>FastEthernet0/12,</local_int>
      <remote_int>FastEthernet1/0/12</remote_int>
    </beginner>
    <beginner>
      <remote_hostname>DLS1</remote_hostname>
      <remote_ip_addr>10.1.1.11</remote_ip_addr>
      <local_int>FastEthernet0/11,</local_int>
      <remote_int>FastEthernet1/0/11</remote_int>
    </beginner>
    <beginner>
      <remote_hostname>ALS2</remote_hostname>
      <remote_ip_addr>10.1.1.14</remote_ip_addr>
      <local_int>FastEthernet0/8,</local_int>
      <remote_int>FastEthernet0/8</remote_int>
    </beginner>
    <beginner>
      <remote_hostname>ALS2</remote_hostname>
      <remote_ip_addr>10.1.1.14</remote_ip_addr>
      <local_int>FastEthernet0/7,</local_int>
      <remote_int>FastEthernet0/7</remote_int>
    </beginner>
    <beginner>
      <remote_hostname>ALS1</remote_hostname>
      <remote_ip_addr>10.1.1.13</remote_ip_addr>
      <local_int>FastEthernet0/10,</local_int>
      <remote_int>FastEthernet0/10</remote_int>
    </beginner>
    <beginner>
      <remote_hostname>ALS1</remote_hostname>
      <remote_ip_addr>10.1.1.13</remote_ip_addr>
      <local_int>FastEthernet0/9,</local_int>
      <remote_int>FastEthernet0/9</remote_int>
    </beginner>
  </show_cdp_neighbors_detail>

Exact same anomaly occured on my other switch.
Affected hardware is running on:
c3560-ipservicesk9-mz.122-55.SE7.bin
c3750-ipservicesk9-mz.122-55.SE8.bin

18 February, 2014

Zombie SSH sessions

Was not able to SSH to my switch:
root@ubu:~# ssh -l admin 10.1.1.11 -s netconf
ssh: connect to host 10.1.1.11 port 22: Connection refused

Everything was working the day before and no changes had been made. Did some debugging and found:

DLS1#sh ssh
%No SSHv1 server connections running.
Connection Version Mode Encryption  Hmac         State                 Username
0          2.0     IN   aes256-cbc  hmac-sha1    Session started       admin
0          2.0     OUT  aes256-cbc  hmac-sha1    Session started       admin
1          2.0     IN   aes128-cbc  hmac-md5     Session started       admin
1          2.0     OUT  aes128-cbc  hmac-md5     Session started       admin
2          2.0     IN   aes128-cbc  hmac-md5     Session started       admin
2          2.0     OUT  aes128-cbc  hmac-md5     Session started       admin
3          2.0     IN   aes256-cbc  hmac-sha1    Session started       admin
3          2.0     OUT  aes256-cbc  hmac-sha1    Session started       admin
4          2.0     IN   aes128-cbc  hmac-md5     Session started       admin
4          2.0     OUT  aes128-cbc  hmac-md5     Session started       admin
5          2.0     IN   aes128-cbc  hmac-md5     Session started       admin
5          2.0     OUT  aes128-cbc  hmac-md5     Session started       admin
6          2.0     IN   aes128-cbc  hmac-md5     Session started       admin
6          2.0     OUT  aes128-cbc  hmac-md5     Session started       admin
7          2.0     IN   aes256-cbc  hmac-sha1    Session started       admin
7          2.0     OUT  aes256-cbc  hmac-sha1    Session started       admin
8          2.0     IN   aes128-cbc  hmac-md5     Session started       admin
8          2.0     OUT  aes128-cbc  hmac-md5     Session started       admin
9          2.0     IN   aes128-cbc  hmac-md5     Session started       admin
9          2.0     OUT  aes128-cbc  hmac-md5     Session started       admin
10         2.0     IN   aes256-cbc  hmac-sha1    Session started       admin
10         2.0     OUT  aes256-cbc  hmac-sha1    Session started       admin
11         2.0     IN   aes128-cbc  hmac-md5     Session started       admin
11         2.0     OUT  aes128-cbc  hmac-md5     Session started       admin
12         2.0     IN   aes256-cbc  hmac-sha1    Session started       admin
12         2.0     OUT  aes256-cbc  hmac-sha1    Session started       admin
13         2.0     IN   aes256-cbc  hmac-sha1    Session started       admin
13         2.0     OUT  aes256-cbc  hmac-sha1    Session started       admin
14         2.0     IN   aes128-cbc  hmac-md5     Session started       admin
14         2.0     OUT  aes128-cbc  hmac-md5     Session started       admin
15         2.0     IN   aes256-cbc  hmac-sha1    Session started       admin
15         2.0     OUT  aes256-cbc  hmac-sha1    Session started       admin

DLS1#who
    Line       User       Host(s)              Idle       Location
   2 vty 1     admin      idle                    5d16h 10.113.214.148
   3 vty 2     admin      idle                    6d17h 10.113.214.148
   5 vty 4     admin      idle                    5d00h 10.113.214.148
   6 vty 5     admin      idle                    5d21h 10.113.214.148
   7 vty 6     admin      idle                    5d19h 10.113.214.148
   9 vty 8     admin      idle                    4d22h 10.113.214.148
  10 vty 9     admin      idle                    4d17h 10.113.214.148
  11 vty 10    admin      idle                    3d16h 10.113.214.196
  12 vty 11    admin      idle                    4d00h 10.113.214.148
  13 vty 12    admin      idle                 20:13:53 10.113.214.196
  14 vty 13    admin      idle                 16:44:06 10.113.214.197
  15 vty 14    admin      idle                 18:37:16 10.113.214.148
* 16 vty 15    admin      idle                 00:01:48 10.113.214.196

Reason for the zombie sessions is exec-timeout 0 0 configured under line vty 0 15
Reconfigured exec-timeout and rebooting the switch cleared the hung sessions.

14 February, 2014

Spanning-tree output formatting to XML

Formatting spanning-tree output into (almost) structured XML.
Can be used to query entire list of VLANs or just the desired ones.
The content of temp4.odm:

###
show spanning-tree
show spanning-tree vlan *
<?xml version="1.0" encoding="UTF-8"?>
<ODMSpec>
<SpecVersion>built-in</SpecVersion>
<Command><Name>show spanning-tree</Name></Command>
<DataModel>
<Container name="ShowSpanningtree">
<Container name="VLAN" alias = "VLANNER" dynamic = "true">
<Property name="VLAN" alias = "VLAN" distance = "0" length = "1" type = "String"/>
<Container name="Priority" alias = "Root_ID" dynamic = "false">
<Property name="Priority" alias = "Root_Priority" distance = "1" length = "1" type = "String"/>
<Property name="Address" alias = "Root_Address" distance = "1" length = "1" end-delimiter = "," type = "String"/>
<Property name="This" alias = "am_root" distance = "4" length = "1" type = "String"/>
</Container>
<Container name="Priority" alias = "Bridge_ID" dynamic = "false">
<Property name="Priority" alias = "Bridge_Priority" distance = "1" length = "1" type = "String"/>
<Property name="Address" alias = "Bridge_Address" distance = "1" length = "1" end-delimiter = "," type = "String"/>
</Container>
<Table name="Interfaces">
<Header name="Interface" type="String" start="0" end="18"/>
<Header name="Role" type="String" start="20" end="23"/>
<Header name="Sts" type="String" start="25" end="27"/>
<Header name="Cost" type="String" start="29" end="37"/>
<Header name="Prio.Nbr" type="String" start="39" end="46"/>
<Header name="Type" type="String" start="48" end="69"/>
</Table>
</Container>
</Container>
</DataModel>
</ODMSpec>